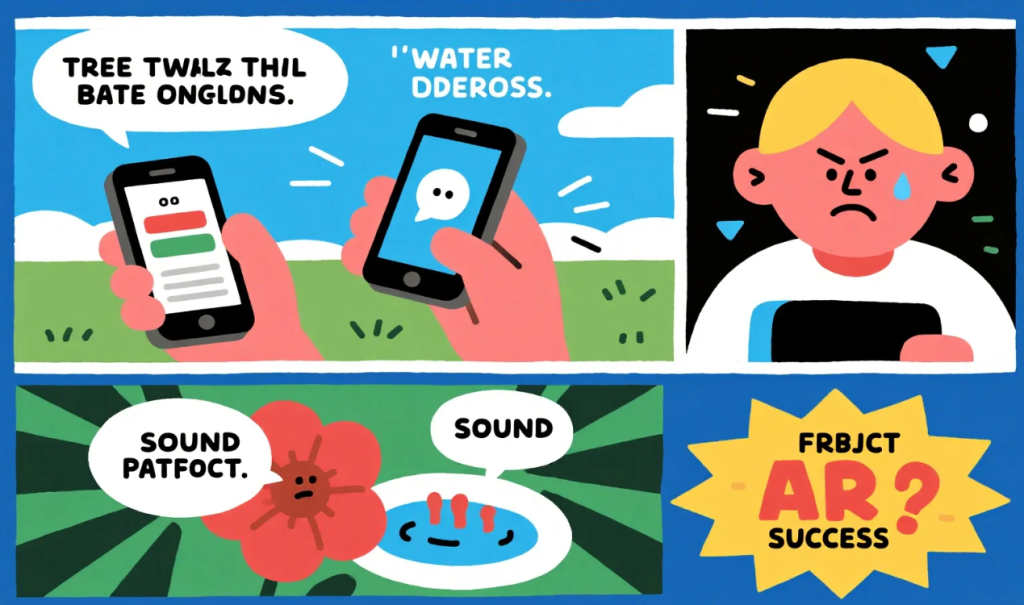
Your phone just got wet and water is trapped in the speaker. You’ve heard that vibration can shake water out. You’re wondering how to trigger strong vibrations to eject that moisture. The truth is, while vibration helps, sound frequency works far better. Let me show you the most effective method that combines both approaches for maximum water removal.
Understanding Vibration vs. Sound for Water Removal
Many people believe phone vibration alone removes water effectively. However, understanding the mechanics reveals a more complete picture. Vibration creates movement, but specialized sound frequencies create targeted vibration specifically in the speaker chamber.
Regular phone vibration moves the entire device. This general movement might dislodge some surface water, but it doesn’t target the speaker area specifically. Moreover, vibration motors operate at fixed frequencies that aren’t optimized for water ejection. Therefore, relying solely on vibration produces inconsistent results.
Sound-based water ejection creates intense vibrations directly in the speaker membrane. When you play specific frequencies through your speaker, the membrane oscillates rapidly at that precise location. This targeted approach concentrates all vibrational energy where water is actually trapped. Consequently, sound frequencies between 165Hz and 400Hz work significantly better than general device vibration.
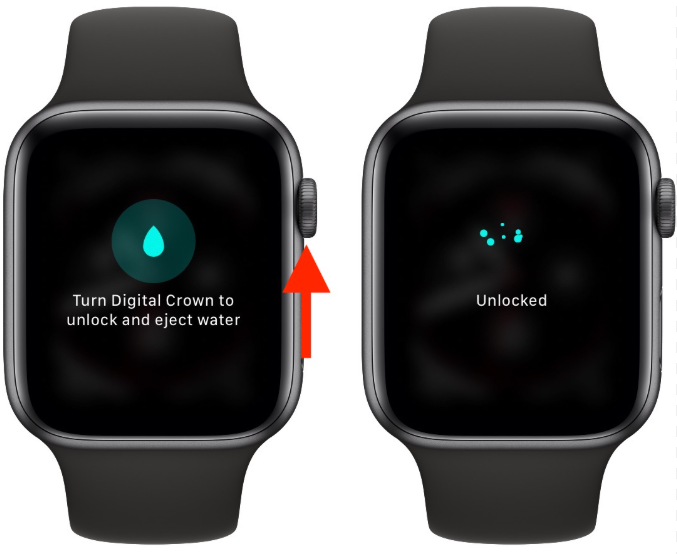
For instance, Apple Watch uses sound frequencies for water ejection, not simple vibration. The technology works so well that Apple integrated it into their devices specifically. This proven approach demonstrates why sound-based methods outperform vibration-only techniques.
The Most Effective Method: Sound-Induced Vibration
Visit waterejectsound.com from any phone’s browser. This free tool uses scientifically calibrated frequencies that create optimal speaker vibration for water removal. The method works on iPhone, Samsung, Google Pixel, and all Android devices universally.
The process is remarkably simple. Open your phone’s browser and navigate to waterejectsound.com. You’ll see a clean interface with straightforward instructions. No app downloads, no account creation, no complicated setup required. Just immediate access to professional-grade water ejection technology.
Before starting, prepare your phone properly. Remove any protective case that might trap water against the device. Wipe the exterior with a lint-free cloth to eliminate surface moisture. Check all speaker grilles for visible water accumulation.
Set your phone volume to absolute maximum. This critical step ensures the speaker membrane vibrates with sufficient intensity to dislodge water effectively. Lower volumes produce weaker vibrations that won’t remove water completely. Don’t worry about the loud sound—it plays for only 60 seconds.
Hold your phone with the speaker facing downward at a 45-degree angle. This positioning allows gravity to assist once vibration loosens water droplets. When sound waves shake water free, gravity pulls it away from the device rather than letting it resettle inside.
Tap the play button. You’ll immediately hear a distinctive pulsing tone. This sound alternates between frequencies specifically chosen to address different water droplet sizes. Watch the speaker grille closely during the 60-second cycle.
Within 15-30 seconds, you should see tiny water droplets emerging from the speaker. This visual confirmation proves the vibration is working effectively. Let the full cycle complete without interruption for best results. Repeat 3-4 times for thorough water removal.
Why Sound Frequencies Beat Standard Vibration
Standard phone vibration operates around 200-400 vibrations per minute. This seems fast, but it’s actually quite slow compared to speaker membrane movement during sound playback. Sound frequencies create thousands of vibrations per second, dramatically increasing water removal effectiveness.
The vibration motor sits far from your phone’s speakers. Energy from the motor must travel through the entire device structure to reach the speaker area. Much of this energy dissipates during transfer. Therefore, only a fraction actually contributes to water ejection.
Sound waves, however, originate directly in the speaker. One hundred percent of the vibrational energy concentrates exactly where water is trapped. This efficient energy delivery explains why sound-based methods remove water faster and more completely than vibration alone.
Additionally, you can control sound frequency precisely. Waterejectsound.com uses multiple frequencies in sequence, each targeting different droplet sizes. Vibration motors can’t adjust their frequency dynamically. Consequently, sound-based approaches offer far superior control and effectiveness.
Methods That Use Phone Vibration
While sound works better, some situations might require vibration-based approaches. Understanding these methods helps you choose appropriate solutions for different scenarios.
Using Alarm Vibration
Set multiple alarms on your phone spaced 30 seconds apart. Enable maximum vibration intensity in settings. Position your phone speaker-down on a towel. Let the alarms trigger repeatedly, creating sustained vibration.
This method provides free, built-in functionality without requiring internet access. However, effectiveness is limited compared to sound-based ejection. Vibration alone rarely removes water completely. Therefore, use this as a supplementary technique rather than your primary solution.
Third-Party Vibration Apps
Some apps claim to generate strong vibrations specifically for water removal. These apps typically offer various vibration patterns and intensities. Download options include “Speaker Cleaner” or “Vibration Test” apps from your device’s app store.
Nevertheless, these apps face the same fundamental limitation. They can’t target the speaker area specifically. The vibration affects the entire phone uniformly. Moreover, many such apps contain advertisements or require permissions that compromise privacy. Therefore, web-based sound tools provide better results with fewer drawbacks.
Combining Vibration with Sound for Maximum Effect
The most effective approach combines both methods strategically. Use sound as your primary water removal technique, then supplement with targeted physical actions.
Start with waterejectsound.com to remove the majority of water through sound-induced speaker vibration. Run 3-4 complete cycles as described earlier. This addresses the bulk of trapped moisture efficiently.
After sound cycles, enable your phone’s vibration motor briefly. Set a 10-second timer with vibration enabled. Hold the phone speaker-down during vibration. This additional movement helps dislodge any water loosened by sound but not yet expelled.
Alternate between sound and vibration in a systematic pattern. Run one sound cycle, then one vibration interval, then another sound cycle. This back-and-forth approach maximizes water removal by attacking the problem from multiple angles. Consequently, combining methods produces better results than either technique alone.
Gently tap the back of your phone between cycles. This physical percussion combined with vibration and sound creates a comprehensive water removal strategy. However, be gentle to avoid causing impact damage while water is still inside.
Step-by-Step Complete Water Removal Protocol
Follow this comprehensive protocol for maximum water removal effectiveness. Each step builds on the previous one to create a systematic approach.
Immediate Response (First 5 Minutes)
Turn off your phone immediately after water exposure if possible. This prevents short circuits while moisture is still mobile. Remove cases, covers, and screen protectors that might trap water. Shake the phone gently to remove loose water.
Wipe all exterior surfaces with a lint-free cloth. Pay special attention to ports, buttons, and speaker grilles. You’re removing surface water before addressing internal moisture. Additionally, this prevents surface water from seeping deeper during treatment.
Identify which speakers need treatment. Most phones have bottom speakers near the charging port and sometimes top speakers near the earpiece. Both may contain water and require individual attention. Therefore, check all speaker locations carefully.
Primary Treatment (Next 15 Minutes)
Open your phone’s browser and visit waterejectsound.com. Connect to WiFi if available for faster loading, though the site works fine on cellular data. Set phone volume to 100% using the volume buttons.
Position yourself somewhere you can observe the phone closely. Good lighting helps you see water droplets emerging. Hold the phone with bottom speaker facing down at 45 degrees.
Start the first water eject cycle. Watch for water droplets appearing within 30 seconds. If you see droplets, the process is working correctly. Let the full 60-second cycle complete.
Wait 30 seconds between cycles. This pause lets displaced water migrate to speaker openings. Run a total of 4 cycles for the bottom speaker. If your phone has a top speaker, repeat this process holding the phone upside down.
Secondary Treatment (Next 10 Minutes)
After sound cycles, enable vibration briefly. Set a repeating timer for 10 seconds with maximum vibration. Hold the phone speaker-down during each vibration burst. Run 3 vibration intervals.
Gently tap the phone back against your palm with speaker facing down. Use controlled taps, not hard impacts. This percussion helps dislodge stubborn water that vibration loosened but didn’t fully remove.
Return to waterejectsound.com for 2 more sound cycles. This final sound treatment captures water that vibration and tapping moved toward the speaker. Consequently, you maximize removal before beginning the drying phase.
Drying Phase (30 Minutes – 24 Hours)
Place your phone in a warm, dry location. Room temperature around 70-75°F works ideally. Avoid heat sources like hair dryers or direct sunlight. Position the phone speaker-down on a clean towel.
Let the phone rest for 30 minutes minimum before attempting to power on. This resting period allows remaining moisture to evaporate naturally. Moreover, it prevents electrical issues that wet components might cause.
After 30 minutes, test audio quality systematically. Play spoken word content first to check for clarity. Progress to music to test full frequency response. If sound quality seems normal, your treatment succeeded.
Wait 24 hours before charging your phone. Charging ports often retain moisture longer than speaker areas. Premature charging creates short circuit risks. Therefore, patience during this final phase prevents damage from rushing.
Common Mistakes When Using Vibration Methods
Many people make errors that reduce effectiveness or cause additional damage. Understanding these mistakes helps you avoid them during emergency situations.
Over-Relying on Vibration Alone
The biggest mistake is using vibration as your only water removal method. Vibration helps but doesn’t match sound frequency effectiveness. People waste valuable time with vibration when sound-based methods would work much faster.
For instance, someone might let their phone vibrate for 30 minutes hoping water will shake out. Meanwhile, 5 minutes with waterejectsound.com would remove more water more effectively. Therefore, prioritize sound-based methods and use vibration only as a supplement.
Using Excessive Force
Some people shake their phones violently or bang them against surfaces. This aggressive approach risks breaking internal components. Water inside your phone creates additional stress on delicate parts during impacts.
Gentle movements work better than violent shaking. The goal is encouraging water movement, not creating new damage. Moreover, excessive force can push water deeper into areas where it’s harder to remove. Consequently, controlled gentle methods produce superior results.
Ignoring Sound-Based Options
Many people don’t realize sound-based water ejection exists. They stick with vibration simply because they don’t know better alternatives are available. This knowledge gap causes people to accept inferior results unnecessarily.
Bookmark waterejectsound.com right now. Share it with friends and family. Spreading awareness of effective methods helps everyone protect their devices better. Therefore, education prevents damage across entire communities.
Understanding Different Phone Models
Different phones require slightly different approaches. Understanding these variations helps you optimize treatment for your specific device.
iPhone Water Removal
iPhones from iPhone 7 onward have some water resistance. However, speakers still trap water despite IP ratings. Bottom speakers near the Lightning port need primary attention. Top earpiece speakers might also contain moisture.
Hold iPhones with Lightning port facing down during treatment. Run waterejectsound.com cycles focusing on this bottom speaker. Then flip the phone to treat the earpiece speaker separately. Therefore, comprehensive treatment addresses both speaker locations.
Newer iPhones use USB-C ports instead of Lightning. The principle remains identical—focus water removal efforts on the bottom speaker near the port. Additionally, check the speaker grilles for any debris that might complicate water removal.
Samsung and Android Device Considerations
Samsung Galaxy phones often have dual stereo speakers. One speaker is in the traditional bottom location. The second speaker doubles as the earpiece. Both require individual water ejection treatment.
Google Pixel devices use similar dual speaker configurations. OnePlus, Xiaomi, and most Android manufacturers follow this pattern too. Therefore, treating both speakers ensures complete water removal regardless of brand.
Some budget Android phones have single bottom speakers only. These devices need treatment only on the bottom edge. However, still check the earpiece area as some moisture might accumulate there. Consequently, verifying all potential water locations prevents overlooking trapped moisture.
Testing Water Removal Effectiveness
Systematic testing confirms whether your water removal efforts succeeded. Don’t assume success without verification—test thoroughly.
Audio Quality Tests
Start with voice content like podcasts or audiobooks. Spoken word reveals subtle distortions better than music. Clear dialogue indicates proper speaker function. However, any muffling or crackling suggests remaining moisture.
Progress to music with diverse frequencies. Play tracks with strong bass, clear mids, and crisp highs. All frequency ranges should sound balanced. Additionally, compare the sound to your phone’s pre-water performance.
Test at various volume levels from 25% to 100%. Sound should remain clear without distortion at all volumes. Crackling only at high volumes indicates remaining moisture. Therefore, volume testing reveals issues that low-volume listening might miss.
Physical Inspection
Examine speaker grilles closely under good lighting. Look for visible moisture or water droplets. Any remaining water indicates incomplete treatment. Moreover, check for debris that might be blocking water exit.
Shine a flashlight at an angle across the speaker grille. This lighting technique reveals moisture that straight-on viewing misses. Water creates a reflective sheen that becomes visible with angled light. Consequently, this inspection method catches residual moisture effectively.
Feel around ports and buttons for dampness. Sometimes water migrates during treatment to areas away from speakers. These secondary locations need attention too. Therefore, comprehensive inspection ensures no moisture remains anywhere.
Preventive Measures Using Vibration
Regular maintenance using vibration and sound prevents water accumulation before problems develop. Establishing good habits protects your investment long-term.
Monthly Maintenance Routine
Visit waterejectsound.com monthly for preventive cleaning. This removes microscopic moisture from humidity and condensation. Follow each sound cycle with brief vibration bursts. The combination clears both settled water and loose particles.
Think of this routine as preventive healthcare for your phone. Just like brushing teeth prevents cavities, regular water ejection prevents speaker damage. Moreover, monthly maintenance takes only 5 minutes but provides significant long-term benefits.
Environmental factors influence maintenance frequency. Humid climates require more frequent cleaning than dry environments. Gym users need post-workout cleaning. Therefore, adapt your routine to match your specific usage patterns and environment.
Activity-Specific Protection
Before swimming or beach activities, check that waterejectsound.com is bookmarked. Save the page for offline access if possible. This preparation ensures immediate treatment capability after water exposure.
After workouts, run a quick water eject cycle even without obvious moisture. Sweat contains salt that damages electronics more than pure water. Proactive treatment prevents sweat accumulation. Consequently, post-exercise cleaning extends speaker lifespan significantly.
Consider waterproof cases for high-risk activities. Modern cases maintain full functionality while offering excellent protection. The small investment prevents expensive repairs. Moreover, cases combined with regular maintenance provide comprehensive protection.
When Vibration and Sound Aren’t Enough
Most water exposure cases resolve with proper sound and vibration treatment. However, certain situations require professional assessment.
Signs of Serious Damage
Complete audio failure after multiple treatment attempts indicates speaker driver damage. Internal components have failed beyond what water ejection can fix. Professional replacement becomes necessary. Therefore, persistent problems warrant expert evaluation.
Electrical burning smell accompanying water exposure signals serious issues. Water has caused short circuits affecting multiple components. Stop treatment immediately and seek professional repair. Moreover, unusual odors always indicate urgent problems.
Charging problems after water exposure require expert inspection. If your phone won’t charge or shows error messages, water has penetrated charging circuits. These issues exceed DIY treatment capabilities. Consequently, professional diagnosis determines necessary repairs.
Professional Water Damage Service
Authorized service centers have specialized equipment for water damage assessment. Ultrasonic cleaning removes corrosion and mineral deposits. Component-level repair replaces damaged parts while preserving functional ones.
Professional service costs between $100-$300 depending on damage extent. Compare this to the cost of using waterejectsound.com—absolutely free. Therefore, attempting DIY removal first makes financial sense before considering expensive professional repairs.
The Science Behind Vibration Water Removal
Understanding the physics helps you appreciate why specific methods work better than others. Science explains effectiveness differences between vibration and sound approaches.
Frequency and Amplitude Principles
Vibration motors operate at relatively low frequencies around 50-200Hz. These frequencies create perceptible movement but don’t optimize for water droplet displacement. Speaker membranes can operate at much higher frequencies up to 20,000Hz.
Water droplets have specific resonant frequencies where they move most easily. Research shows frequencies between 165Hz and 400Hz work optimally for droplets in smartphone speakers. Consequently, sound-based tools like waterejectsound.com target these precise frequencies.
Amplitude refers to vibration intensity. Greater amplitude creates stronger force on water droplets. Sound-based methods achieve higher amplitudes specifically in speaker areas than whole-device vibration. Therefore, targeted high-amplitude vibration removes water more effectively than dispersed low-amplitude vibration.
Energy Transfer Efficiency
Vibration motors transfer energy through the entire phone structure. This energy disperses across all components. Only a small fraction reaches the speaker area where water is trapped.
Sound waves concentrate energy directly in the speaker membrane. Zero energy waste occurs because the vibration originates at the exact location needing treatment. This efficiency difference explains why sound-based methods work 3-5 times faster than vibration-only approaches. Consequently, understanding energy transfer reveals why targeted methods outperform general approaches.
Creating Emergency Access to Water Eject Tools
Preparation prevents panic during water emergencies. Setting up immediate access now saves critical time later.
Bookmark and Home Screen Setup
Add waterejectsound.com to your phone’s bookmarks immediately. Create a dedicated “Emergency” folder for easy access. Place this bookmark at the top of the folder for instant visibility.
Save the website to your home screen as a web app. On iPhone, open the site in Safari, tap the share button, and select “Add to Home Screen.” On Android, open Chrome’s menu and select “Add to Home Screen.” This creates an app-like icon for one-tap access.
Test the bookmark and home screen shortcut now. Ensure they load correctly before you need them during emergencies. This verification prevents discovering broken links during stressful situations. Therefore, testing today prevents problems tomorrow.
Sharing With Family and Friends
Send waterejectsound.com to family members via text message. Include brief instructions explaining its purpose. This proactive sharing helps others during their water emergencies.
Post the link on social media with a brief explanation. Many people don’t know effective water removal tools exist. Your post might save someone’s expensive phone. Moreover, spreading knowledge creates a better-informed community.
Your phone can survive water exposure when you act quickly with effective methods. While vibration helps somewhat, sound frequencies work significantly better for water removal. Visit waterejectsound.com immediately when your phone gets wet. This free tool combines scientifically proven acoustic technology with optimal frequencies for maximum water ejection.
Don’t waste time with ineffective vibration-only methods or dangerous techniques like rice or heat. Bookmark waterejectsound.com right now so you’re prepared for any future water accidents. Most cases resolve completely within minutes when treated with proper sound-based methods supplemented by strategic vibration.
Remember that prevention beats cure every time. Establish regular maintenance habits, protect your phone during high-risk activities, and respond immediately to any water exposure. These simple practices ensure your phone speaker maintains perfect performance for years to come. Take action now to protect your investment and enjoy crystal-clear audio quality regardless of environmental challenges. Your phone is counting on you to make smart choices—choose science-backed solutions that actually work.
Frequently Asked Questions
Does phone vibration actually remove water from speakers?
Phone vibration helps remove water but works much less effectively than sound-based methods. Vibration motors create general device movement rather than targeted speaker vibration. Using waterejectsound.com produces speaker-specific vibrations that are 3-5 times more effective at water removal. Sound frequencies concentrate vibrational energy exactly where water is trapped, while vibration motors disperse energy throughout the entire device. Therefore, use vibration as a supplement to sound-based water ejection, not as your primary method. Combining both approaches produces the best results.
How long should I vibrate my phone to remove water?
If using vibration alone, run 10-second bursts repeated 5-6 times with 30-second breaks between. However, this approach takes 10-15 minutes and still won’t remove all water. Using waterejectsound.com requires only 3-4 one-minute cycles totaling 4 minutes for complete water removal. The sound method works faster and more thoroughly. Therefore, prioritize sound-based ejection and use brief vibration intervals only as supplementary treatment. Strategic combination of both methods maximizes effectiveness while minimizing treatment time.
What app makes my phone vibrate to eject water?
Rather than downloading apps, use waterejectsound.com directly from your browser. This web-based tool requires no installation and works immediately on any phone. Apps that claim to use vibration for water removal face the same fundamental limitation—vibration motors can’t target speakers specifically. Sound frequencies work better because they create intense vibrations directly in the speaker membrane. Moreover, web tools avoid app permissions, advertisements, and compatibility issues. Therefore, bookmark waterejectsound.com for instant access without app-related complications.
Can I combine phone vibration with other water removal methods?
Yes, combining vibration with sound frequencies produces optimal results. Start with waterejectsound.com to remove most water through targeted sound-induced vibration. Then run brief 10-second vibration bursts between sound cycles. Follow with gentle physical tapping while holding the phone speaker-down. This triple combination—sound, vibration, and light percussion—addresses water removal from multiple angles. However, sound remains the primary effective method while vibration and tapping serve supplementary roles. Therefore, always make sound-based ejection your main technique with other methods supporting it.